
Can you caulk over grout? Actually, you need to be very careful as these 2 substances even though used for similar things are quite different.
Because if you caulk over your grouting incorrectly it can lead to mold and mildew growing which can be harmful to your health, cause allergies, and make you sick.
Not only that it will look disgusting in your house to have moldy patches everywhere.
So when can you put caulk over grout?
This is rarely the advised way to fix issues you may be having. It is often recommended to re-grout first, or scrape out all of the old grout and fill the holes with just caulk.
This is because mold and mildew can develop in between the caulk and grout if the area is exposed to moisture. If this is left to develop, it can cause your walls or flooring to become moldy too.
However, if done correctly and you are willing to replace it if the process fails, caulking over grout is possible.
Many people do opt to do this as it is cheaper, simpler, and faster than re-grouting.
DISCLOSURE: TheRuggedRooster.com is reader supported so if you buy any products featured on this site I may earn an affiliate commission. As an Amazon Associate I earn from qualifying purchases. Read my full disclosure here.
How to replace grout with caulk
You should use a grout saw to remove all of the pre-existing grout from the area in question.
We suggest using a vacuum cleaner to suck up any dust and debris. This is because the caulk will apply and adhere better to clean surfaces.
Using your caulk gun, gently and carefully apply caulk to the gaps. You must place the tip of the nozzle at a 45-degree angle to the surface and gently press on the trigger to push the caulk out.
Drag the caulk gun backward across the area you are caulking. It is important to keep a consistent pressure on the trigger as you do this.
We recommend smoothing this out with a damp finger after application for the cleanest result. Alternatively, you could use the tip of the nozzle or the back of a spoon to do this.
How to caulk over a grouted area
If you have decided to just go for it and caulk over the grout you must clean the grout first.
Using bleach and a toothbrush, carefully clean all of the grout you are going over.
This will help to kill any bacteria that may get trapped underneath the caulk.
The bacteria could lead to the formation of mold if not removed correctly. You should allow it to dry for 24 hours before you proceed.
Once the area is clean and dry, you can apply the caulk in the same manner as above.
Press firmly with your finger when smoothing it out to ensure a strong bond to the grout.
How to replace caulk
You should use a Stanley knife to carefully prise the old caulk out. Be careful not to damage the tiles or yourself as you are doing this.
If there are areas that it seems to be sticking, use a specially designed caulk removing liquid.
If there is any grout there you should clean it with bleach and a toothbrush to kill bacteria. Vacuum up any loose grout and clean with mineral spirits. Leave the area to dry for 24 hours.
Apply caulk as per the instructions above. Wipe away any excess with a damp cloth and leave it to dry for 24 hours. Do not expose it to moisture during this time.

How do you know when to replace caulk?
Generally speaking, caulk should last for around 5 years. This varies according to the application process and manufacturer though, so it may be sooner.
If you do not notice issues, you should still re-caulk after 5 years.
The type of caulk, its quality, the condition of the surface it was put onto all influence the lifespan of your caulk job.
The humidity of the room, how often and deeply you clean, and any mold that was there initially all have an impact too.
If you begin to notice any mold or mildew growing underneath the caulk, you need to recaulk it.
This is a sure sign that water is leaking into the gap. This is one of those issues that you need to deal with sooner rather than later.
If the caulk appears to be peeling, cracking, drying out, or falling off it needs to be replaced.
If any of these issues appear it indicates that the seal provided by the caulk has been compromised.
This can lead to serious structural damage to your home. It is cheaper and easier to just recaulk the affected areas.
What is caulk?
Caulk is a silicone, cement, or latex-based product. It is commonly used to join gaps between wood, metal, glass, and ceramics.
Caulk is waterproof and tends to be applied around bathtubs, showers, and sinks.
It is also good for joining materials on two separate planes - like at a corner. It is prone to shrinking as it dries out, meaning that the joint can be left exposed.
This provides an opportunity for water to enter the joint and can lead to mold developing.
It is used to give a strong bond between tiles, but it can stick well to most surface types. It is flexible and does not crack as pressure is applied.
It is often used to prevent water damage near pipes, drains, and windows.
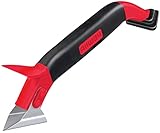
- Multifunction 3-in-1 caulk tool with comfortable soft-grip
- Use the steel blade to quickly remove old, dried caulk
- Rotatable silicone rubber triangle with 3 bead profiles (narrow, medium, or wide) applies caulk and smooths it to satisfaction
- Scraper end allows for easy edge clean-up
- Works with acrylic, latex, and silicone caulk and is handy for window, bath, and shower projects
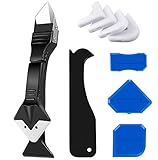
- 🛠️【Caulking Tool Kit】include Multifunction caulking scrapers, silicone pads, different shapes sealant finishing tool, etc., This set of upgraded tools can help you repair the gap and clean the residual glue, Improve the Agglutinating Quality and the Aesthetic Sense of Surface. Which could help you caulk like a pro in seconds!
- 🛠️【 4 IN 1 Caulking Finishing Tool】This caulking tool can help you repair the gap and clean the residual glue, which is convenient and beautiful, Improve the agglutinating quality and the aesthetic sense of the Surface. Perfect for corners and seamless joint. Finish to most silicone jobs, any edge, corner, joint.
- 🛠️【Replaceable 5 Silicone Pads】The Caulking Tools was designed with Non-slip push-pull button, replace the 5 silicone pads which you want( including 3R,6R,10R,13R,17R radius) easy to clean without wasting caulk; And they are reusable with a long lifetime.
- 🛠️【Wide Application】 Works well with most types of sealant, silicone, resin, grout, and more. Ideal for use in showers, windows, siding, sinks, and tubs with latex, silicone, or acrylic caulk. The caulking tools can use for home, kitchen, bathroom, tank, window, sink joint, and so on.
- 🛠️【Caulking finishing tool】These caulking tools specifically designed to make the tough task of caulk removal easy and fast without damaging surfaces. Can improve the agglutinating quality and the aesthetic sense of surface easily and quickly. You will happy that use these caulking tool kit instead did a professional looking job easily.
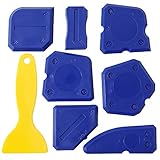
- Caulking Tool: Multiple sizes and shapes for caulking joints gives you maximum versatility in finishing any joint with your preferred joint compounds, from silicone to glazing putty.
- Caulking Finishing Tool: This have many different shape and size, caulk lines tool suitable for more different sealing jobs, to any edge, corner and joint.
- Material: Made of hard silicone of high quality plastic 3 in 1 caulking tools, They are reusable. Good tool to remove leaky silicone and grout lines.
- Wide application: the caulking tool is suitable for most types of sealant such as DIY crafts or resin, grout and more.
- Using Occasions: the caulk tool set can be widely applied for kitchen, bathroom, tank, door, window, kitchen, bathroom, tank, sink joint filling finishing.
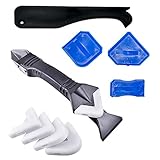
- ❤️【3 In 1 Caulking Tools+4 Pieces Sealant Finishing Tool 】This set of upgraded tools can help you repair the gap and clean the residual glue, Improve the Agglutinating Quality and the Aesthetic Sense of Surface
- ❤️【Two Mode Scrapers】Stainless Steel scraper remove stubborn old glue, Silicone Trowel to remove surface bumps and dents, It's an good tool for smoothing sealing lines, caulking lines; Finish to most silicone jobs, any edge, corner, joint
- ❤️【Save cost】The caulking tools are very easy to clean with a damp cloth and reuse, reduce the waste of sealant, no need for masking tape, convenient and quick to use, saves money and time
- ❤️【Replaceable 5 Silicone Pads】The Caulking Tools was designed with Non-slip push-pull button, replace the 5 silicone pads which you want( including 3R,6R,10R,13R,17R radius)
- ❤️【Wide Application and Good Service】The caulking tools can use for home, kitchen, bathroom, tank, window, sink joint and so on. and we provide good service for our users, refund fast and replace a new one.

- 7-Piece Streamline Spatula Set
- Comfortable Curved Handle
- Precision ground for optimum flexibility for perfectly finished joints
- Rounded tips for standard applications, yet easy to modify for unique applications
- No plastic components means easy solvent clean-up
What is grout?
Grout is a cement-based product. It often contains water, sand, and fine gravel as well as cement. It can be tinted to become a range of colors.
Grout can only be used between materials on the same plane. It tends to be used between stone, glass, and tile - particularly in areas where there are large gaps.
As the grout does not shrink, it tends to be the better option for installing larger furniture. For this reason, it is often what is used to install bathtubs.
It can crack due to movement, and this is something you should be aware of. This is because it does not contain latex to give the grout flexibility.
Grout helps to protect the corners and edges of tiles against chipping. It also helps to prevent water from entering the walls of your house.
So, Can i caulk over grout?
As you can see from this post it is rarely advised to caulk over grout
These 2 substances even though used for similar things are quite different and doing it incorrectly it can lead to mold and mildew growing which can be harmful to your health.
Last update on 2024-10-18 / Affiliate links / Images from Amazon Product Advertising API